Timesheets
On Timesheets, submit Candidates' timesheets, view details about the submitted ones, and track their progress. Hide the imageSee the image.
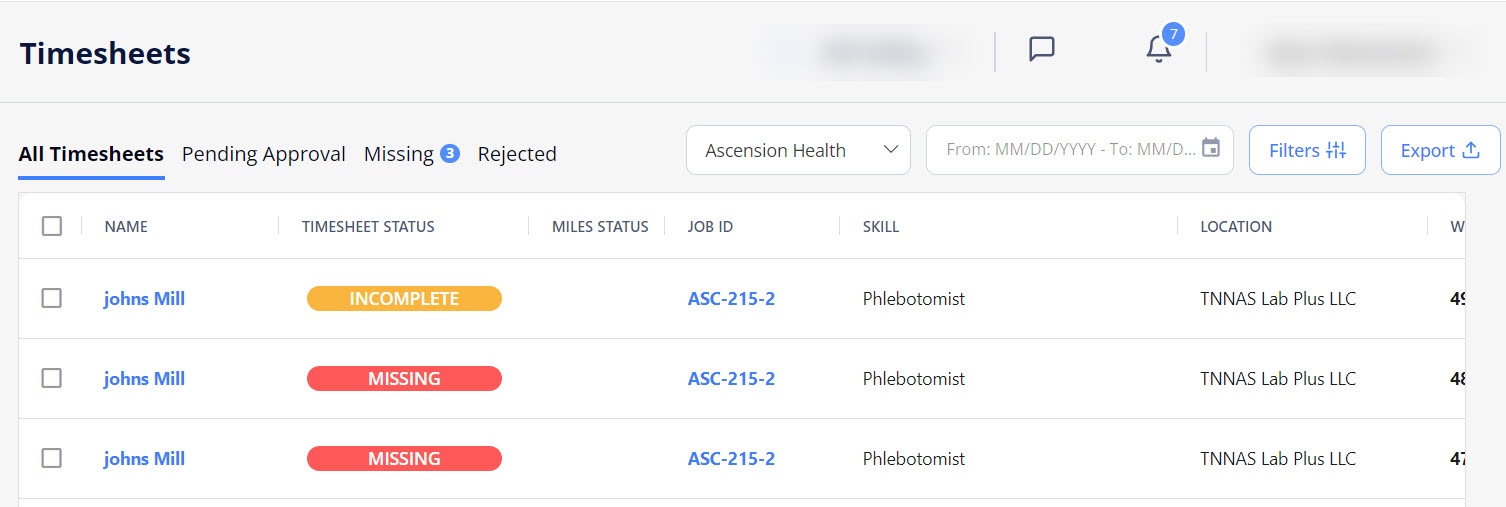
- You may take certain actions on timesheets only if you have the proper permissions.
Timesheet workflow
The timesheet workflow in Einstein II includes the following stages:
- After a Candidate is onboarded and their first day of work starts, the system automatically creates a timesheet with the Incomplete status for the first work week.
- Once the work week is complete, your Agency fills in and submits the Candidate's timesheet by entering the time, miles spent and visits.
- You can add miles for a timesheet only if the Organization covers the miles the Candidate spends getting to work.
- Depending on your partnership Organization's configuration, one of the following timesheet flows is possible at this stage:
- If the auto approval of timesheets is turned ON, then the timesheet becomes Approved right after the submission.
- If the auto approval of timesheets is turned OFF, then the submitted timesheet becomes Pending Approval. You can view it on the Pending Approval tab and wait for the Organization to approve the provided time, miles and visits.
- The timesheets for a Candidate per week continue to be created until the order reaches its End Date or the order/Candidate is cancelled.
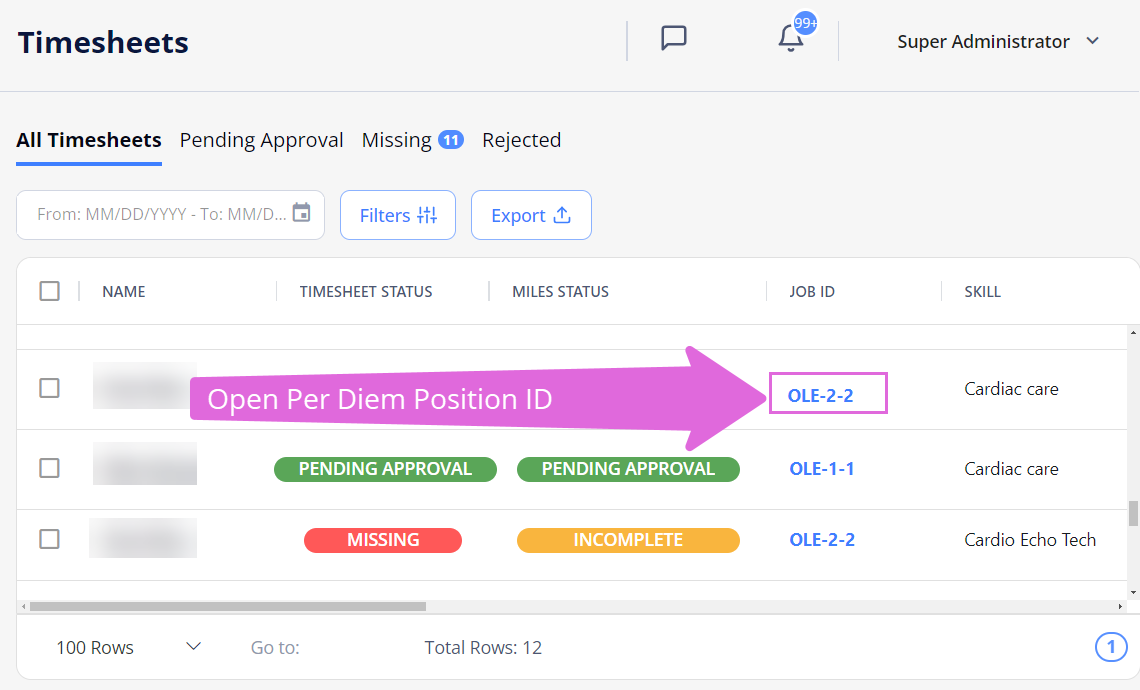
Timesheets for Open Per Diem orders
For each Open Per Diem order, the system creates a single timesheet with all its associated re-orders (dates) per Candidate per week.
The Job ID for such timesheet points to the corresponding Open Per Diem position ID of the Candidate. Hide the imageSee the image.
Selecting the Job ID link will take you to the Candidates tab of that Open Per Diem order.
Timesheet, Miles, Visits, and Expenses
A timesheet consists of the following parts, which form the amount of money the partnership Organization is to pay to your Agency for the specific job fulfillment: time (always included in a timesheet), miles (if provided), visits (if provided), and expenses (if provided).
In an opened timesheet, you can see all or some of the following tabs, depending on the data it includes (See the imageSee the image):
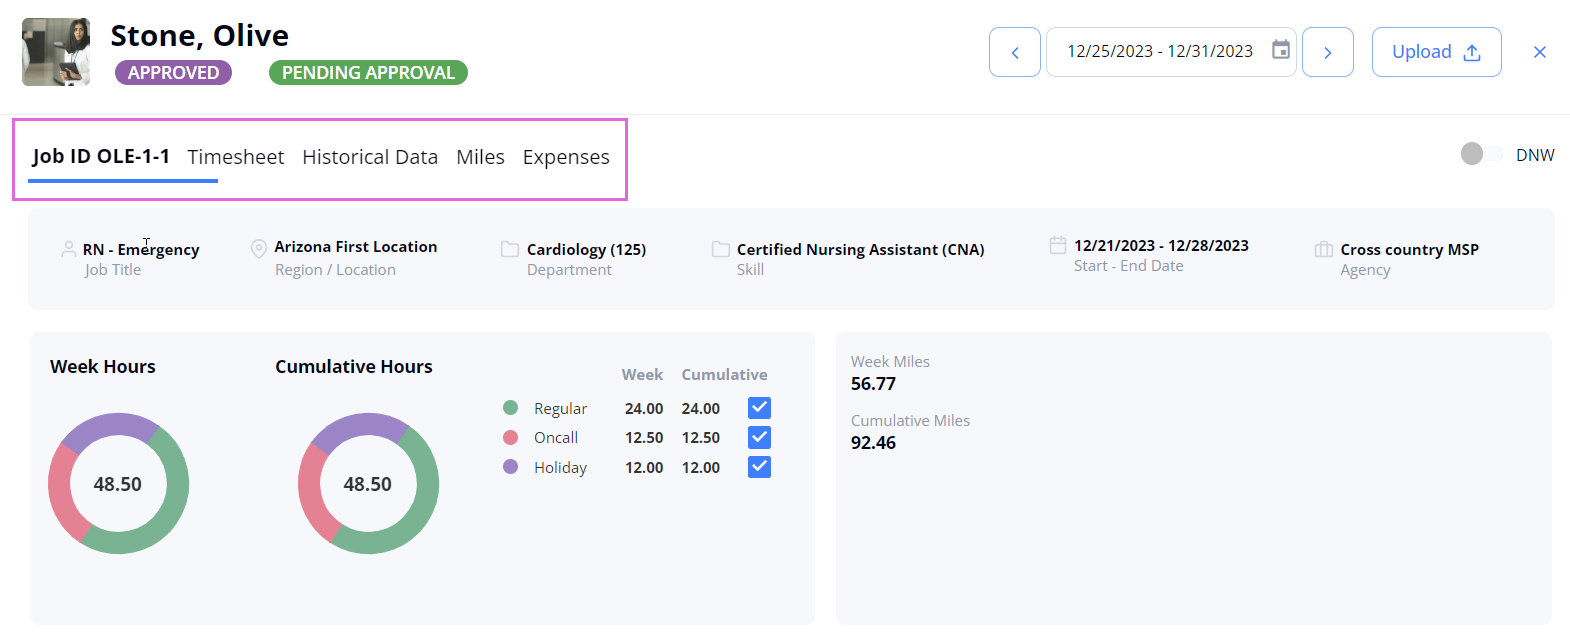
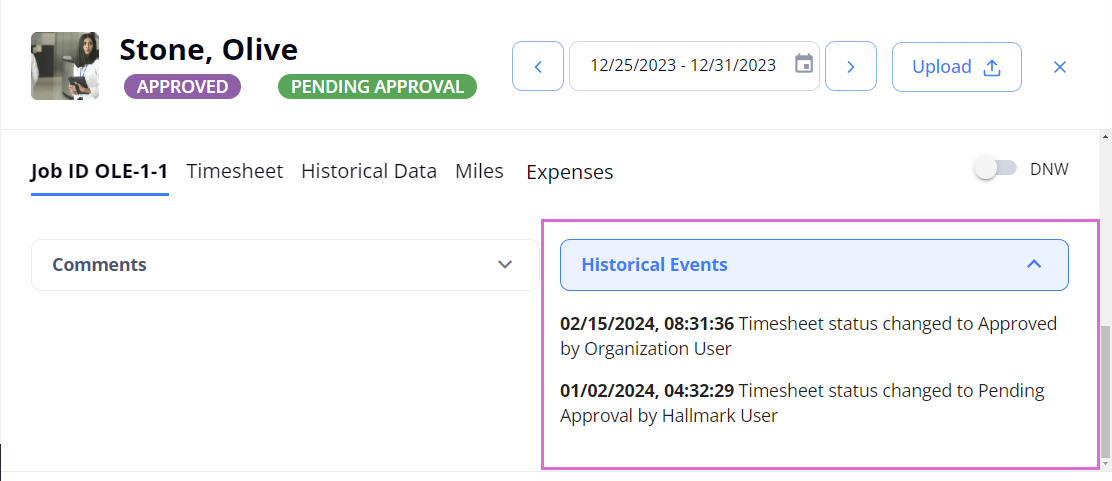
- Job ID: displays the related job details and timesheet details, such as week hours/miles/visits and cumulative hours/miles/visits. Here you can also view the Historical Events section to check the history of the timesheet's status changes. See the imageSee the image.
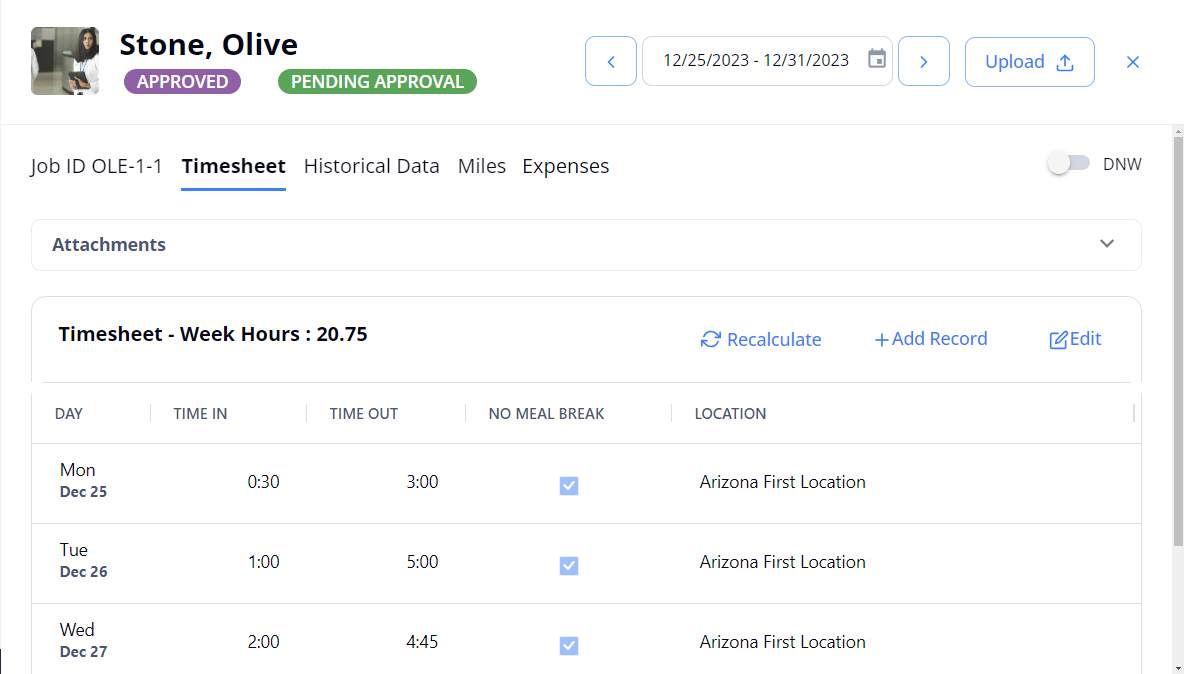
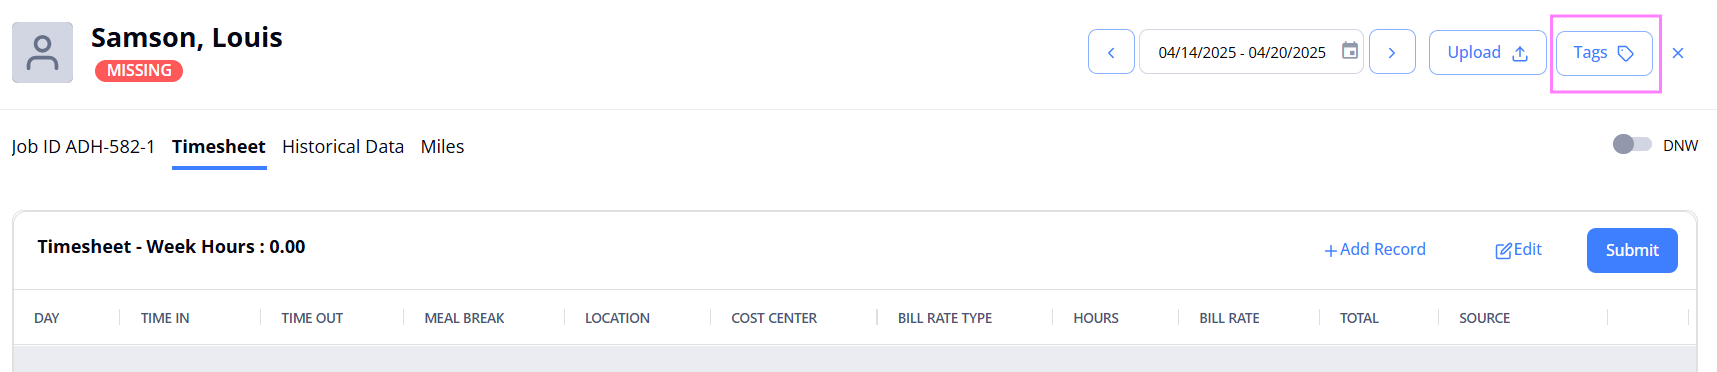
- Timesheet: displays all working hours (time) of a Candidate for one week added by your Agency. Here, you need to indicate the day, time in, time out, cost center, bill rate type, and other details. Then, the system automatically creates the final amount for the week. See the imageSee the image.
- The bill rate type for working hours can be the following: Regular, Callback, Oncall, Charge, Orientation, and Preceptor. You may only see the types that are approved between your Agency and its partnership Organization. Each bill rate type may have a coefficient towards the regular rate.
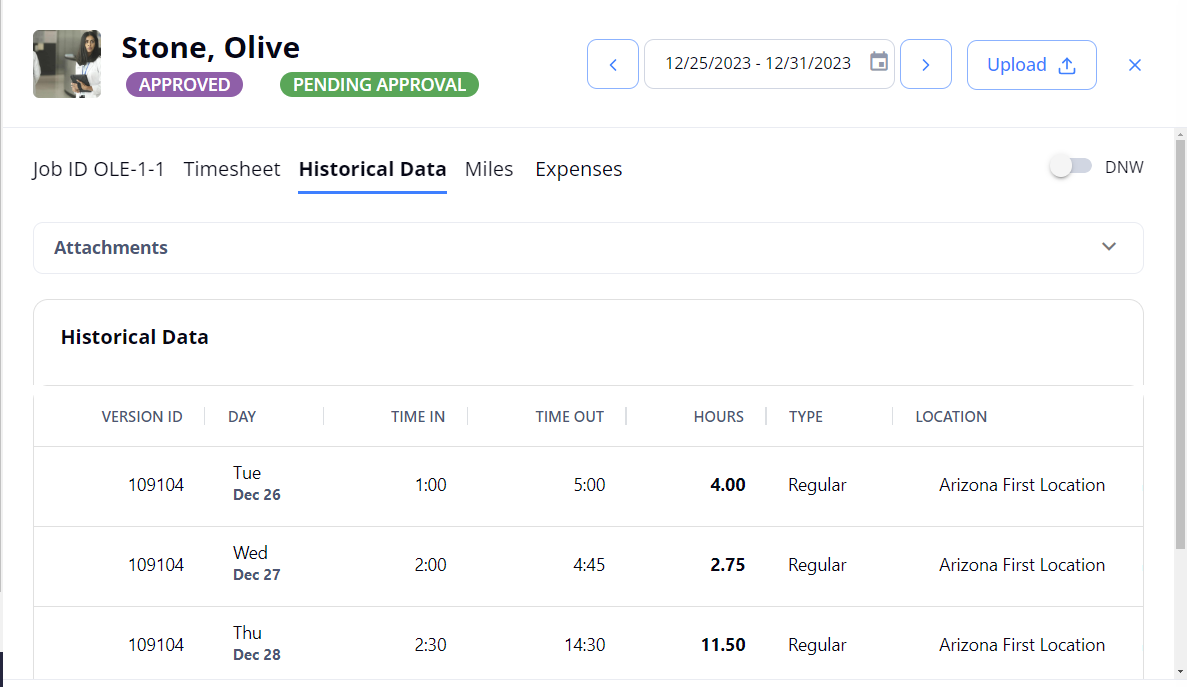
- Historical Data (if not hidden by configuration): displays historical data of the timesheet's versions and modifications to each version. See the imageSee the image.
- For Incomplete, Missing, Pending Approval, and Approved (but not invoiced) timesheets, only the previous and actual versions are visible on the Historical Data tab.
For Approved and invoiced timesheets, all versions are visible on the Historical Data tab.
- For Incomplete, Missing, Pending Approval, and Approved (but not invoiced) timesheets, only the previous and actual versions are visible on the Historical Data tab.
- Miles: displays all miles spent by a Candidate for one week added by your Agency. Here, you need to indicate the day, cost center, and miles. Then, the system automatically creates the final amount for the week. See the imageSee the image.
- The Miles tab appears for a timesheet only if the Organization covers the miles the Candidate spends getting to work. The mileage bill rate is fixed and approved between your Agency and its partnership Organization.

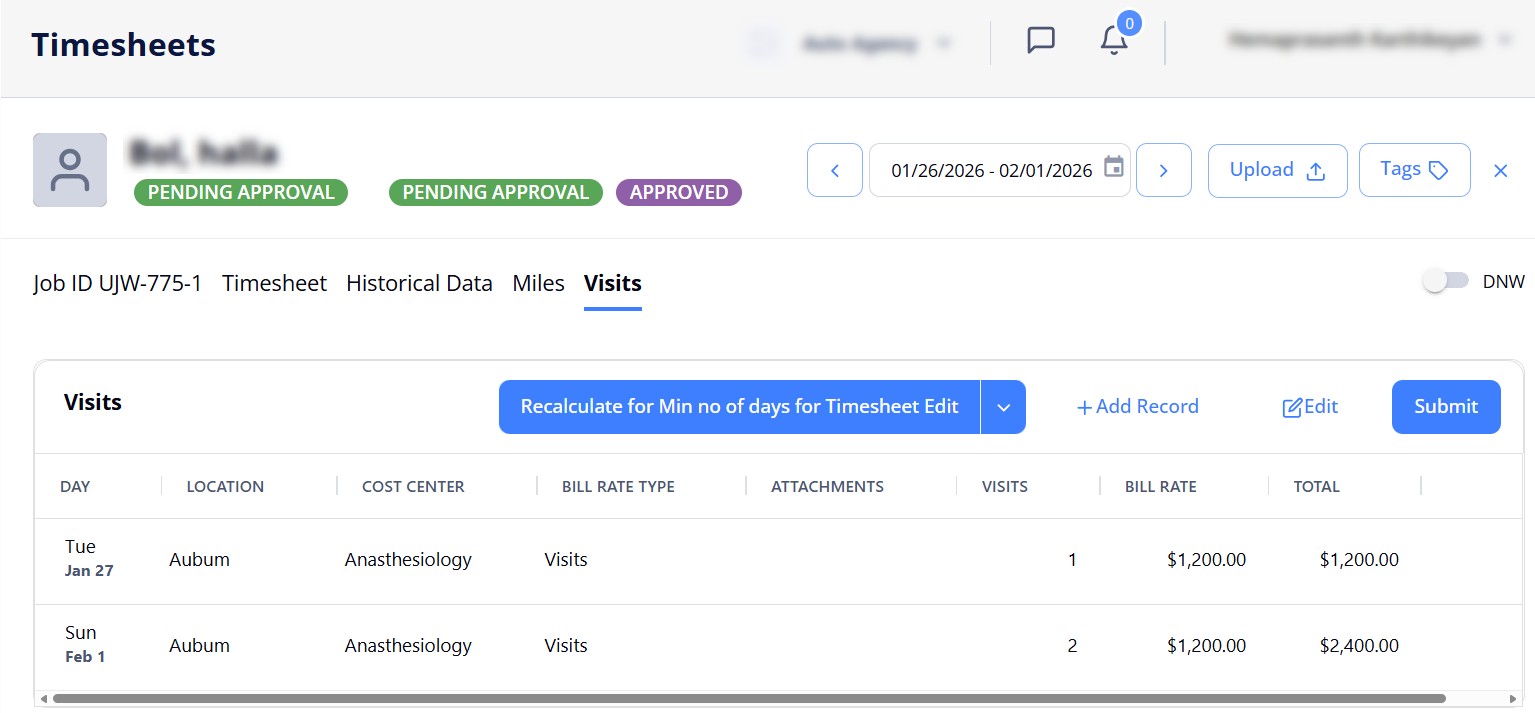
- Visits: displays all visits of a Candidate for one week added by your Agency. Here, you need to indicate the day, location, cost center, and visits. Then, the system automatically creates the final amount for the week. See the imageSee the image
- The visits bill rate is fixed and approved between your Agency and its partnership Organization.
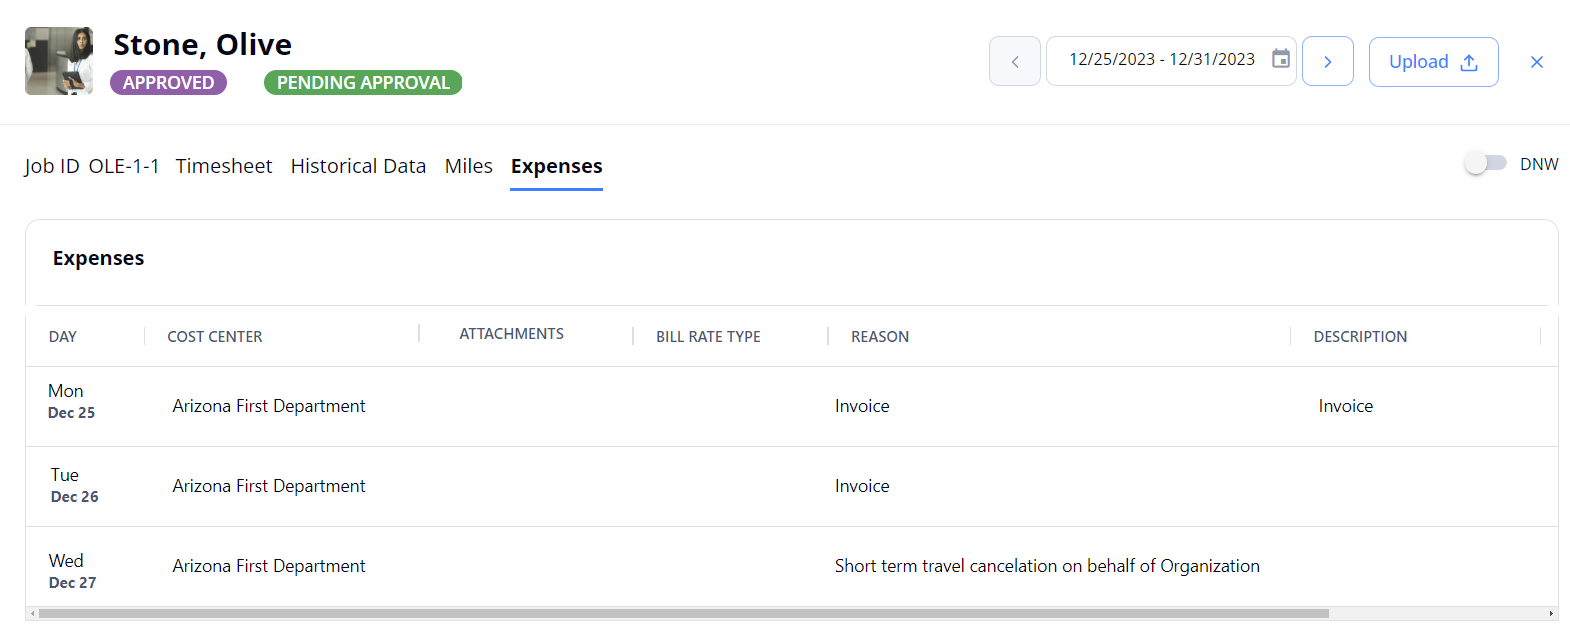
- Expenses: displays records if at least one manual invoice, bonus, or penalty was added to the timesheet. You may not submit the amount indicated on the Expenses tab as it was sent as a manual invoice record for the Organization's approval and shows as an invoice record on Invoices > Manual Invoice Pending tab. See the imageSee the image.
Timesheet, miles, and visits statuses
The timesheets, miles, and visits submitted per Candidate per week can have the following statuses throughout their workflow presented on the corresponding tabs:
- Incomplete: Added timesheet/miles/visits for the current week. They cannot be submitted in this status.
- The Incomplete timesheets/miles/visits appear on the All Timesheets tab only. To find the needed ones faster, you can filter them by the status.
- Pending Approval: Timesheet/miles/visits submitted by your Agency but not approved or rejected by the Organization yet.
- Missing: Unsubmitted timesheet for the previous week. The timesheet gets this status on the first day of the next week after it has been created.
- Rejected: Timesheet/miles/visits rejected by the Organization after your Agency's submission. Your Agency may add, edit, and submit them again for approval.
- Approved: Timesheet/miles/visits approved by the Organization.
By default, your Agency may not edit, add new records, or upload attachments to the approved timesheets. However, this is possible if the Organization's configuration allows your Agency to edit approved timesheets.- The Approved timesheets/miles/visits appear on the All Timesheets tab only. To find them faster, you can filter timesheets by this status.
- Pending Approval*: Timesheet/miles/visits edited after the approval.
- This status may appear only if the Organization's configuration allows your Agency to edit approved timesheets.
Fill in and submit timesheet, miles, and visits
After a Candidate is onboarded, the system automatically creates a timesheet with the Incomplete status and the prepopulated records for each day of the week.
To fill in and submit timesheet/miles/visits:
- On Timesheets, select the needed Missing timesheet in the grid to open the details sidebar.
- In the details sidebar, do the following:
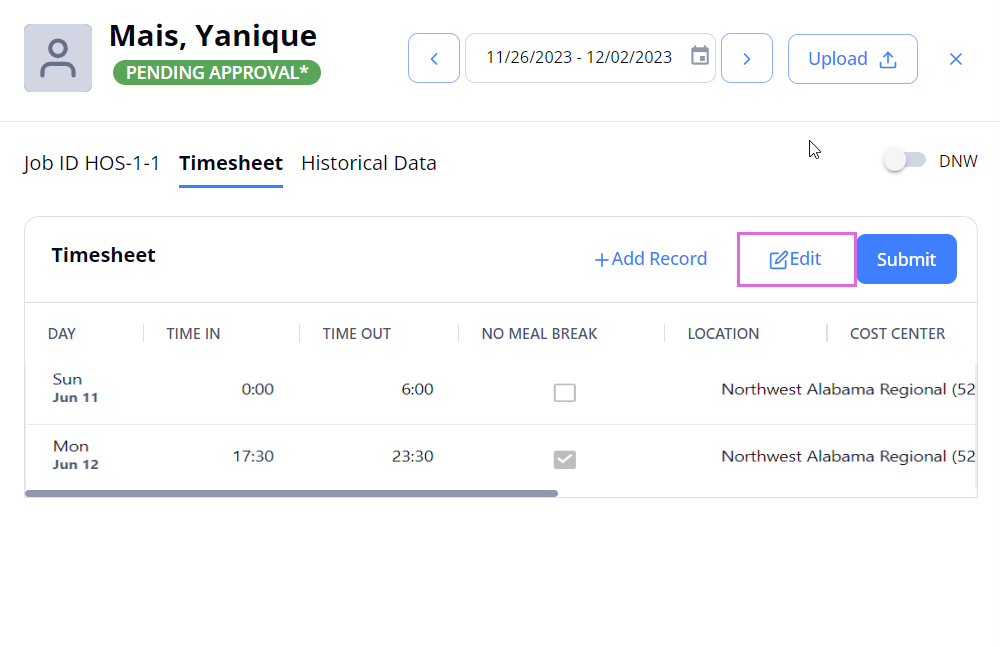
- If you want to submit the timesheet with the Timesheet type, on the Timesheet tab, select Edit or + Add Record, provide all the needed data or edit the needed fields, and then select Save. Hide the imageSee the image.
- A shift cannot be longer than 24 hours.
- If the shift did not include mealtime, you can specify this by turning on the No Meal Break toggle to have the time calculated correctly. Hide the imageSee the image.


- If you want to submit the timesheet with the Miles/visits type, on the Miles/Visits tab, select Edit or + Add Record, provide all the needed data or edit the needed fields, and then select Save. Hide the imageSee the image.

- If you want to submit the timesheet with the Timesheet type, on the Timesheet tab, select Edit or + Add Record, provide all the needed data or edit the needed fields, and then select Save. Hide the imageSee the image.
- Upload the proofs of the Candidate's work by using Upload in the upper right of the sidebar. These are the signed paper timesheets from the Organization. Hide the imageSee the image. The size of the timesheet file must not exceed 20 MB.
- You may skip this step if the proper setting is configured for you by the Administrator.

- Select Submit.
The timesheet/miles/visits status changes to Pending Approval.
You may edit and delete the submitted timesheet/miles/visits until they are approved or rejected by your partnership Organization. If the Organization rejects them, you can make the needed edits: add new entries, edit or remove the existing entries, or upload a timesheet file. After this, you can resubmit the edited timesheet/miles/visits.
- If you have the proper permission assigned by your partnership Organization, you may edit a timesheet even after it is approved. A timesheet then moves into the Pending approval* status. The Organization will see and review all your changes and approve or reject them.
Delete timesheet records
If you have the proper permission, you can delete timesheet record(s) by editing a corresponding timesheet.
To delete a timesheet record:
- Select the needed timesheet in the grid to open the details sidebar.
- On the Timesheet, Miles or Visits tab correspondingly, select Edit. Hide the imageSee the image.
- Select the delete
 icon next to the record(s) you want to remove. Hide the imageSee the image.
- Select Save to update the timesheet.
|
Note the following:
|
|
Mark timesheet as DNW (Did Not Work)
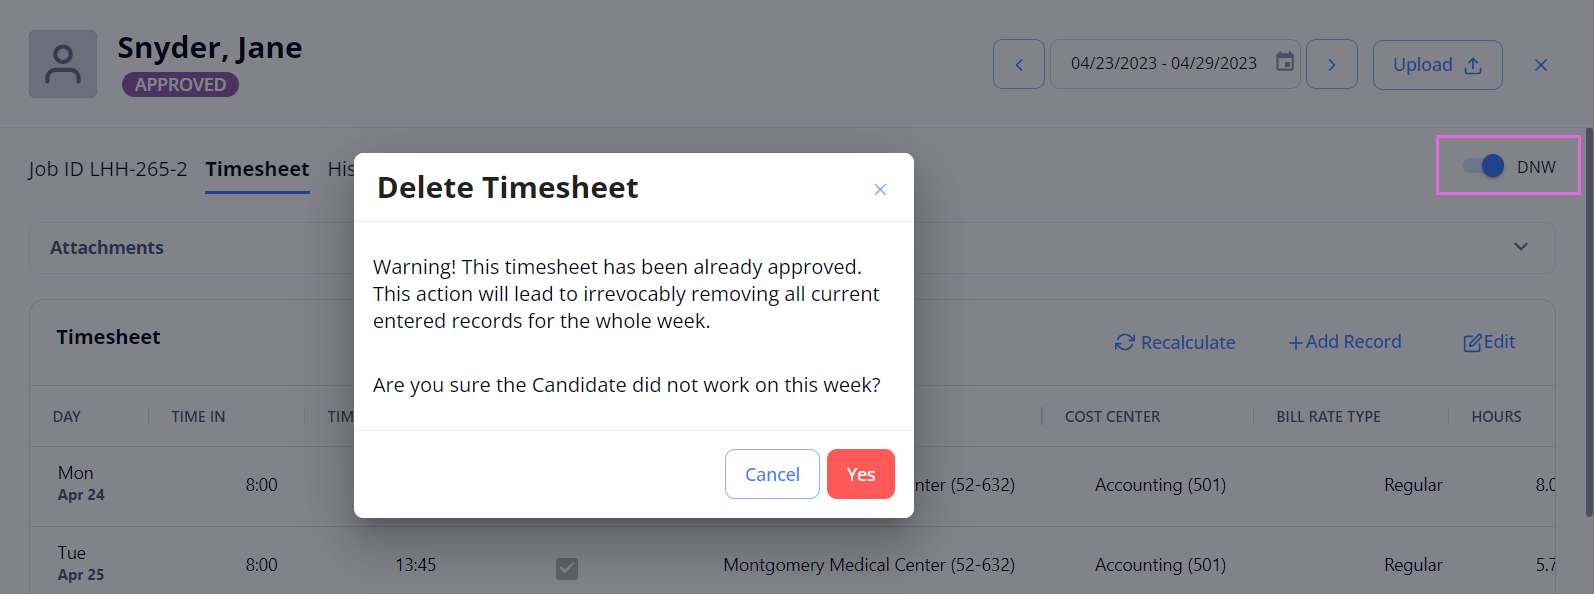
If you have the proper permission, you may delete a not invoiced timesheet by marking it as "Candidate did not work" (DNW) for a specific week regardless of its status. This will exclude working hours, miles spent, visits, or other expenses associated with this timesheet from future invoices and will not allow you to enter new data for this timesheet.
- You may not mark a timesheet as DNW if an invoice has already been generated.
To mark a timesheet as DNW:
- On Timesheets, select the needed timesheet.
- On the details sidebar that opens, turn on the DNW toggle and select Yes in the dialog that appears. Hide the imageSee the image.
Note the following:- If you turn on the DNW toggle for an Incomplete timesheet, its status will change to Approved starting from the first day of the following week.
- If you turn on the DNW toggle for a Missing timesheet, its status will change to Approved immediately.
- If you turn on the DNW toggle for a Pending Approval/ Pending Approval* timesheet, all its records will be deleted and its status will change to Missing.
- If you turn on the DNW toggle for an Approved timesheet with records, all its records will be deleted and its status will remain Approved.
- If you turn OFF the DNW toggle for an Approved timesheet with no entries, its status will change to Missing. After this, you can add new records to the timesheet or mark it as DNW.
Comment on timesheet
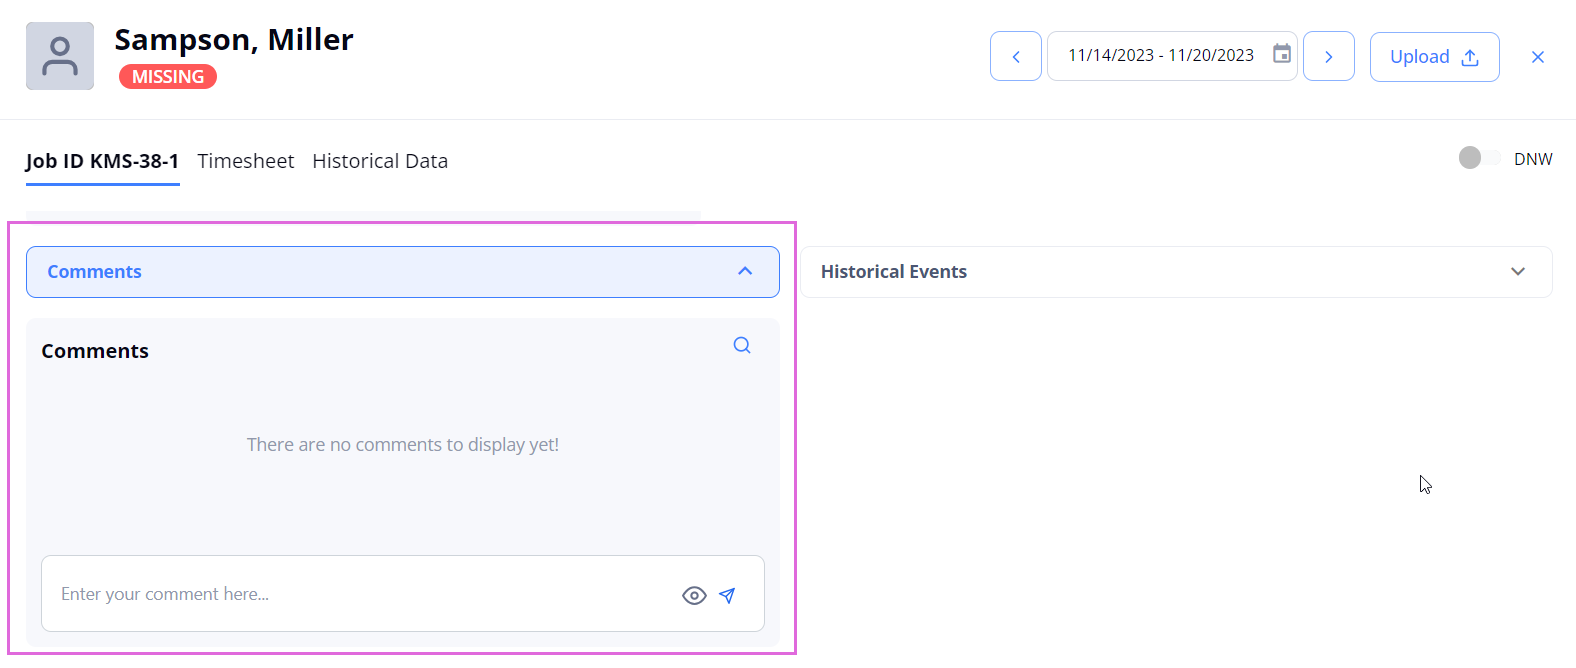
You can add external comments for a timesheet of any status (Hide the imageSee the image). External ![]() comments are visible to both your Agency's internal users and the partnership Organizations' users.
comments are visible to both your Agency's internal users and the partnership Organizations' users.
To add a comment:
- On Timesheets (any tab), open the needed timesheet.
- On the Job ID tab, expand the Comments section and type your comment.
- Send the comment by using the send
 icon.
icon.
- To receive alerts whenever comments are added to the timesheets that you work with, subscribe to the Timesheet Level Comments notifications on Communication > Notification Subscription. You might need to contact your Administrator to manage your notifications subscription.
Filter timesheets
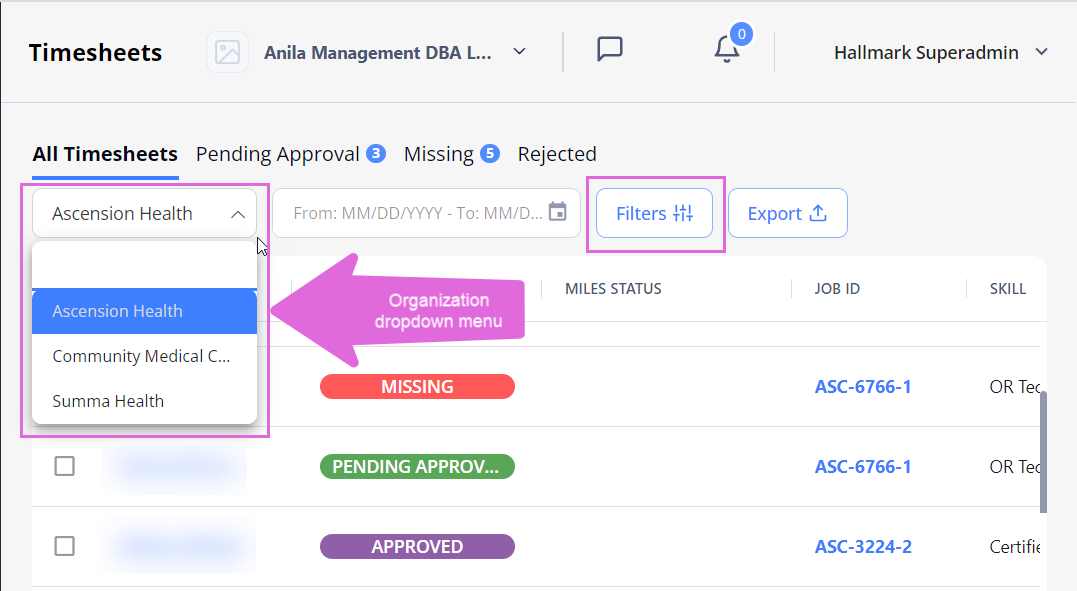
Use Filters to access the needed timesheets faster. You can sort the needed timesheets by Candidate name, order ID, status, region, location, department, skill, and other parameters. The applied filters will be preserved on this specific page.
Also, use the Organization dropdown menu to select the Organization to display the related timesheets in the grid.
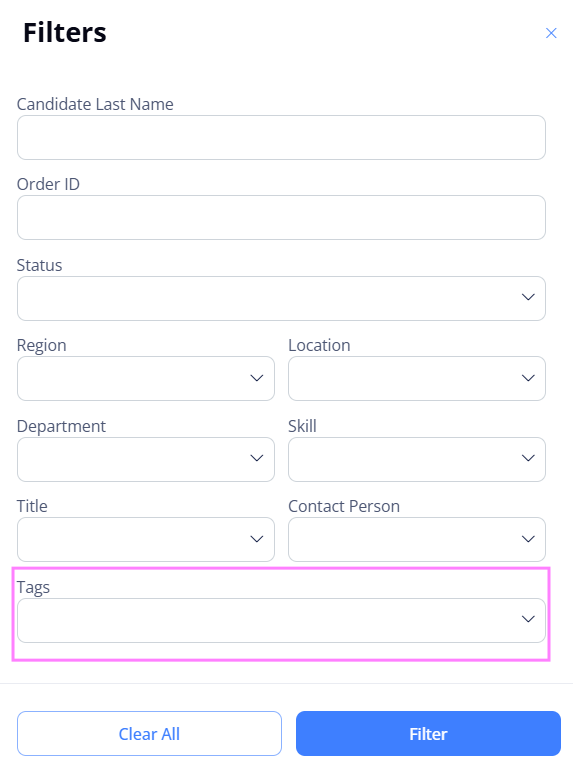
- If you have permission, you can use the Tags option to add keywords or labels (Maximum of 50 characters) to an timesheet (See the imageSee the image). To filter timesheets by tags in Timesheets, go to Filters > Tags (See the imageSee the image) and select the required tags.
Export timesheets
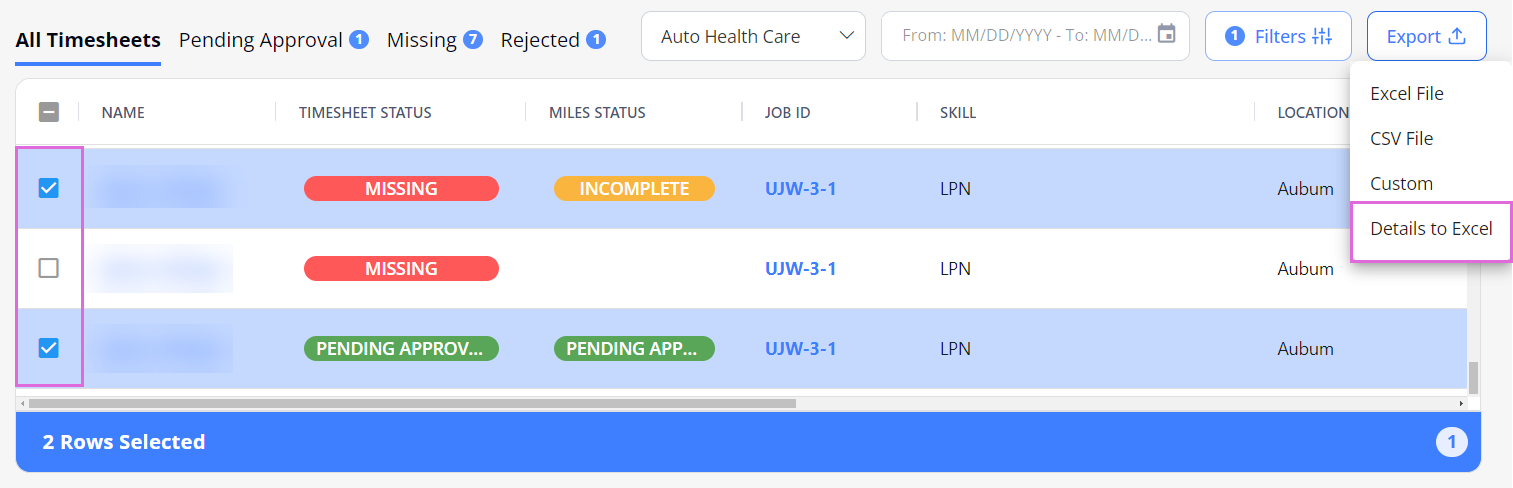
To export general information about all timesheets from any tab, select Export on the specific tab of the Timesheets page and choose the needed format: Excel File, CSV File, or Custom. Hide the imageSee the image.
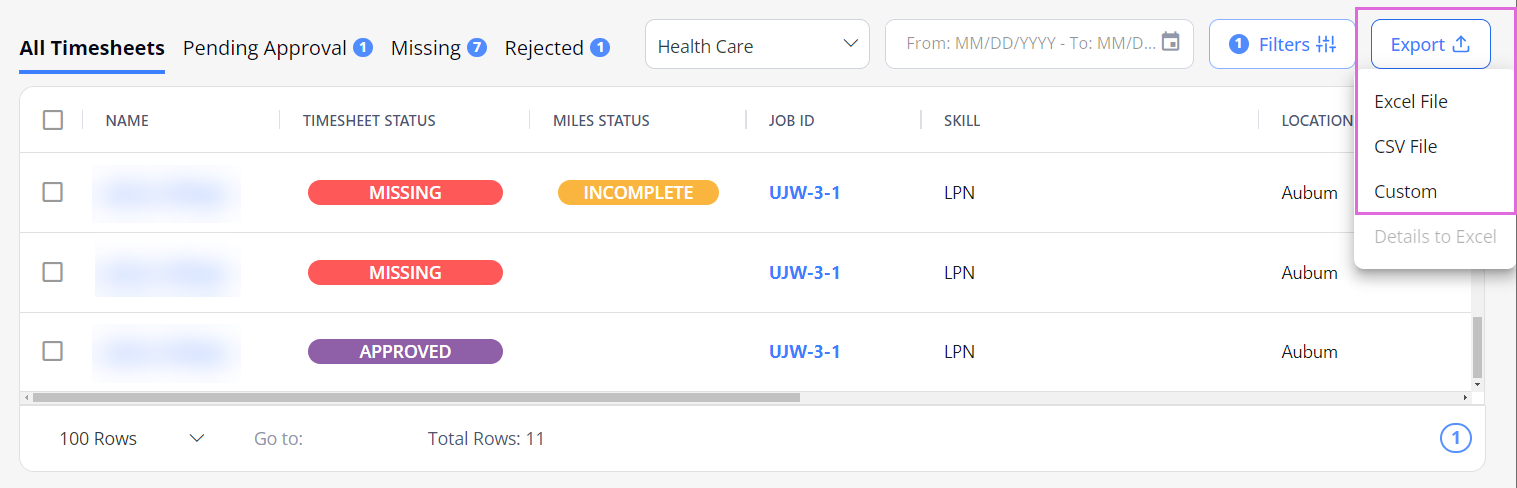
You can also select specific records in the grid to be exported.
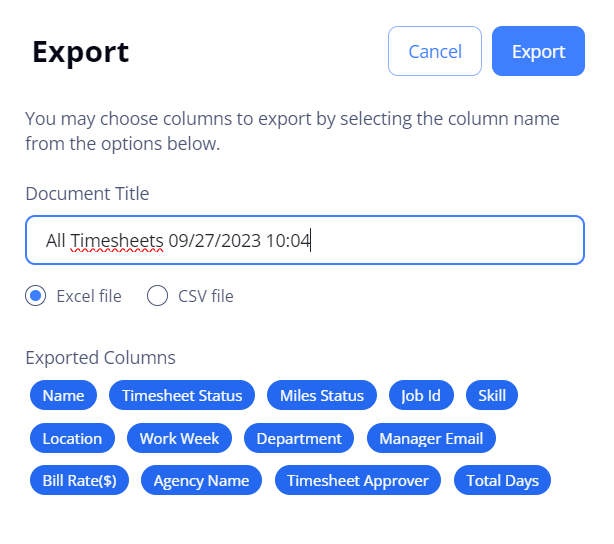
By default, all the columns in the grid are exported to the file. By selecting the Custom option, you can change the document title and choose which columns you want to export from the grid. Hide the imageSee the image.
To export details of a specific timesheet(s), select the needed record(s) in the grid, and from the Export menu, pick Details to Excel. Hide the imageSee the image.
- You may export timesheets only if you have the proper permission.
Custom flow
In some cases, Agency can skip a regular flow. If you want to set up a custom flow, contact your Administrator.